Skin deep…

Last fall I bought a new clear Lexan body for my Shredder from ARCS, but it was already getting cool outside so I didn’t paint it right away – figuring it could wait until spring.

Well, spring is here! After deciding on a simple paint scheme and ordering the paint I had to scrub the body well on the inside so the tape would stick properly (to mask off the panel colours)


You use masking tape to hide the sections where you’ll spray the lightest colours first, then mask off the darker and darker panels (and in the end you’re usually left with only the parts you want black exposed). Here I’m masking off the rear top panel which will be silver:


Next I hide the front of the body which will end up yellow:


Finally I mask off the rear panels that will be red… leaving me with an exposed triangle on each side (which I have already sprayed black):


The I pull off the rear mask and paint the red:


Exposing the front…


…to paint it yellow. Now only the first top panel is covered with tape.


Finally paint the silver section, which was the first part I masked:


Next I pulled off the overspray film, took a first-pass at trimming the wheel wells, and punched the body-mount holes. Then I applied the Redcat decals that came with the body and mounted it on the Shredder with my extra Losi tires:


Here’s the back: thank you Amazing RC Store!


Finally I put my 2wd buggy in the picture for scale: the Shredder is huge compared to my other cars!


I’ll have to trim the body a bit more before I can drive it with those tires, but that’s a task for another day.

Wall to wall carpet…

I’ve been trying to go to Universal Raceway on the weekends: this is what indoor offroad carpet racing looks like (or at least the practice sessions: real races show good driving 🙂 )

That’s timed practice: split into 1/8th-scale buggies, 1/10 buggies, short-course and assorted,…. and finally 15-minute free-for-all sessions. If you watch the back wall as the cars go over the long set of triple jumps you’ll see where a projector shows a pie-chart flashing who should currently be on the track (look around 1:25-1:27 in the video). During races that projector runs the lap timing system.

I broke about $30 in parts there last weekend. Go too fast around a 90-degre corner? Hit a concrete wall. Land wrong from a jump? Slam in to a concrete floor. The cars are durable… but still… little plastic pieces can only take so much.

Resistance is futile… (but can be measured)

I’ve been playing with toy cars long enough to have collected quite a pile of LiPo batteries, even though I’ve done my best to sell some off when I Ebay’d old RC’s I didn’t want any more. Some of the batteries are new, some came used as part of a larger sale, but most of them worked fine. Still, they do degrade over time, and a couple were noticeably down on usable runtime.

I spent some time on Google trying to figure out if there was a way to measure when LiPos go bad: or at least a way to track their deterioration. It turns out the heli/plane RC hobbiests had started to measure their batteries to determine their “Internal Resistance” (IR) or “Effective Series Resistance” (ESR) – packs/cells with higher resistance were less able to sustain voltage under load, and turned more of the current flowing through them into heat. Long story short: low resistance = good, high resistance = bad. I wanted to start recording which brands of batteries were degrading the quickest, so I bought an ESR Meter. Here it is with my 4 4S packs: two Zippys, and two Turnigys:


I had bought the two Zippy’s new, but after 2 summers of running they would constantly bounce off the LVC (low voltage cutoff) if I ran them fast… but would work fine if I drove slow: there was something wrong with them, but I wanted proof. Testing packs was simple: with just the main battery leads hooked up you were measuring the total pack resistance (including wires and Deans connector) under a brief 16a load. Here my used Turnigy nano-tech 5000mah 4S pack was measuring 19.8 mOhms:


With the balance tap plugged into one cell through the battery balance port it would measure the resistance of just that single cell. In this case 3.28 mOhms. This Turnigy battery came used as part of a combo with an RC car, so I don’t know how many times it has been charged, but it has served me well in my RC8Be and RC8Te.


The Zippy batteries showed me the numbers I expected: about 50% higher total resistance of the previous Turnigy (34.2 mOhms):


…and about the same difference in per-cell resistance as well (here 6.92, but as high as 7.36):


When I ran those Zippy packs in my RC8Te they would come off very warm: I knew it was time to retire them but now I have some numbers to back up my decision. Next I fed my other older batteries to the meter: it pointed out one 2S pack with much higher connector resistance (likely a bad solder job, doh!) as well as two packs that seemed OK in a car but the that the meter said were on their way downhill. I’m going to start to record how many charges go through them and measure them again after 10 more cycles.


Finally, the numbers I really wanted to get: resistance from 4 new packs I had just bought from HobbyKing: all Turnigy nano-tech: two 2S saddles for my Losi 22, and two 3S sticks for my Caldera.


The numbers were… in line with what I had read about, but not as low as I had hoped. Average cell resistances were 4.84 and 5.1 mOhms for the saddle packs, and 4.05 and 4.47 mOhms for the stick. Not bad, but not a good as some of my used batteries. The sticks had one charge through them, and the saddles had two: and I had read two things:

  • I should charge them at 1C for the first 5-6 cycles or so
  • Cell resistance often drops after the first few charges

So, I’m going to wait until I’ve run each pack 5-6 times then start charging at 2C, then measure them again after they’ve reached 10-12 cycles. I’m hoping I see their resistances dip (under 4 would be nice)… then slowly climb with age. Based on the Zippy results, once they get around 6 or higher they’ve reached the end of their usable life (at least with the current draw of an 1/8th-scale brushless setup: 1/10th buggy use may be fine?)

Summary numbers:
(all mOhms)
Average for all my new Turnigy cells with 1-2 charges through them: 4.62
Average for my almost-dead cells: 7.13
Average for all my used cells that seem OK when driving: 3.99
Lowest resistance cell: 3.28 in a Turnigy nano-tech 4S 5000mah “40-90C”
Highest resistance cell: 7.36 in a bad Zippy 4S 40C
Average connector/wire resistance (pack resistance, minus per-cell resistances): 6.39

Update: April 2nd 2013

I now have 15 cycles through one of my Turnigy 65-130c 2s 5100 saddle packs, and 17 cycles through the other. One pack dropped average cell ESR from 4.84 to 4.78, and the other increased from 5.12 to 5.34 – so effectively the “actual C” rating of the packs didn’t change. I measured at the same temperature, and after full balance charging. I’ll try to measure them again around 30 cycles.

Spring in your step…

…or in your toys 🙂

Soon after buying my Caldera SC 10E I swapped out the stock shocks with a set of Traxxas Ultra XXL’s… since I didn’t have extra springs for the stock Redcat shocks (and they seemed to stick a bit)… and because I had the Ultras on the shelf with lots of springs left over from running my Stampede.


The Ultras XXL’s are a bit longer but fit fine: the extra length just gaves you some extra droop – swapping in XL shafts probably would have made them the same length as stock. (Note: If you put Traxxas Ultras on your Caldera, buy an Integy MSR9 spring set as a cheap way to get a good initial collection of springs – I ended up using a pair of the front springs: blue/4.7’s and red/5.8’s. Or buy Traxxas or Losi springs)

I wanted to recycle the Traxxas shocks on another project, so I started to read more about the stock Redcat’s. Someone on a forum said they were similar to Traxxas E-Revo/Jato “GTR” shocks, and the overall size of the springs seemed close enough, so I ordered some GTR springs. I had also smashed a stock lower spring retainer… and the only Redcat option seemed to be to buy a new set of shocks, so I ordered some GTR retainers as well. Part #TRA5465: I only needed the bottom pieces but I was hoping the ride-height ring or shock cap may fit as well:


The GTR springs fit perfectly on the stock Caldera shocks, and the bottom retainer does as well (but the ride-height ring had a finer thread and didn’t fit, and I didn’t try the shock caps). On the left is the stock shock w/retainer and the stock white spring, and on the right is a Traxxas GTR spring and GTR bottom retainer on the Redcat shock body. GTR springs are a few mm shorter than stock Redcat, but that difference is easily accounted for by twisting the ride height ring a bit further down.


The retainers are effectively identical: it was hard to get a good picture but the Caldera is on the left and the Traxxas is on the right. They use the same cut-out design and the only way I could tell them apart was that the Traxxas one had much sharper and distinct molding (more defined corners) while the Redcat corners were more rounded.


So what does this mean? Traxxas GTR aluminum shocks are almost certainly a drop-in replacement for the Caldera shocks (though I haven’t tested this: the springs are a tiny bit shorter). At a minimum GTR springs can be used and are very easy to find, since every hobby shop stocks Traxxas. And GTR lower spring retainers can be used instead of buying all new shocks if you smash your Redcat ones!


Traxxas GTR springs are sold with a totally different number rating than you may expect, at least compared to Integy ratings if you had Ultra shocks. Since I was using 4.7/5.8 springs on the Ultras I bought similar ratings for the GTR springs… but they were way way too stiff! I ended up using 1.8-front and 1.6 rear… and those are still slightly firmer than the stock springs. Here’s some GTR Traxxas part numbers I dug up: ((w) is a white spring, (r) is a red spring):

TRA5427 0.7 Yellow (w)
TRA5428 0.9 Orange (w)
TRA5429 1.0 Tan (w)
TRA5430 1.1 Green (w)
TRA5431 1.2 Silver (w)
TRA5432 1.3 Gold (w)
TRA5433 1.4 Pink (w)
TRA5434 1.6 Blue (w)
TRA5434a 1.6 Double Blue (r)
TRA5940 1.8 Double Green (r)
TRA5941 2.0 Double Black (r)
TRA5942 2.3 Double Purple (r)
TRA5435 2.6 Yellow (r)
TRA5436 2.9 White (r)
TRA5437 3.2 Orange (r)
TRA5438 3.5 Green (r)
TRA5439 3.8 Gold (r)
TRA5440 4.1 Tan (r)
TRA5441 4.4 Black (r)
TRA5442 4.9 Silver (r)
TRA5443 5.4 Pink (r)
TRA5444 5.9 Blue (r)
TRA5445 6.4 Purple (r)

Final Note: A small bit of maintenance on your stock shocks can make them significantly less sticky. With mine, even with the oil drained and the springs off, I found the shafts had a lot of stiction making the shafts hard to slide in and out. The problem was two-fold: first the bottom outside oring cap was screwed on much too tight (all the way down) which was squashing the orings and making them bind to the shock shaft much too tightly: unscrewing that cap by about 1mm immediately made the piston movement much easier, and the shocks still didn’t leak. Second: the two orings had been squashed in there so hard the outside one was running completely dry – a little bit of AE or Losi shock lube (I used this) coating the orings before I put them back in made the shocks even smoother. Still not as nice as Traxxas/Losi/AE shocks with TiNi shafts, but much better than out-of-the-box!

Winter is here, sort of…

Normally winter starts when we get our first doesn’t-melt-the-next-day snowfall, but living in Toronto I’ve had to make exceptions. This year I’m counting winter as starting today, when I first moved my summer hobby indoors.


I made my first trip back to Universal Raceways with a new-to-me Team Losi 22 2wd buggy, bought from a really friendly guy I met on LondonRC.

This isn’t my video, but it does show how I should be driving, eventually:

Today if I made it one lap without flipping the car over I patted myself on the back. Baby steps.

MegaE XB10 – More Mega…

[Recovered: Original post date Sept 16th 2012]

My Himoto buggy has been running fine, but hot: the 4600kv Castle motor I had in it was faster than stock… but I’ve read that even the slower stock motor ran hot: and there’s not much room to gear down. Solution: buy a cheap slower motor, in this case a Tacon 3660 3500kv.

Here it is compared to the previous motor: new Tacon on top (light green) and old Castle on the bottom (dark green). The Tacon is about 1cm longer:


It just clears the ESC… the motor wires on Tacons aren’t that flexible, so I let them ride over the ESC fan and bent the ESC wires to meet the motor wires instead:


Here it is after the first test run:


Because I wanted better performance in the grass I had also ordered a set of 2.2″ ST tires: at $20 for a pack of 4 I couldn’t say no. During the test runs the motor and ESC were on the upper range of acceptable temperatures with the body off… but still too hot with the body on. The buggy body fits tight… so I’ll drill some holes in my old basher body first to see if I can bring the temps down. If that doesn’t work I may turn it all the way into a Stadium Truck so the motor can hang out in the breeze.

Domo Arigato Mr. … Himoto?

[Recovered: Original post date August 5th 2012]

If you sell things on Ebay, you’re going to end up with PayPal cash burning a hole in your pocket. And they you’ll be tempted to buy stuff back off of Ebay. And I’ve been selling things on Ebay… …which is how I ended up winning a bid on a Himoto MegaE XB10 4wd buggy roller. It was in rough shape and I wasn’t really looking for a 4wd buggy… so I lowballed $20. And won. 🙂

Here it is, all beat up.


It looks like the previous owner stripped the front drive gear at some point, and instead of repairing it they pulled the center driveshaft, front diff and front dogbones and ran it 2wd (and didn’t cover the holes in the front gearcase, it was full of dirt 🙁 . The front of the body was snapped off and replaced with a chunk of plastic, then painted on the outside flat-black. And a number of other parts were missing. It looks like it was run in 2wd mode until it was finally crashed and the front hub and carrier broke… then it was put up for sale.

With the generous help of Eddie @ HimotoRacingUSA.com I was mailed the parts I needed, and now have this!


I had all the electrics already on the shelf: a FlySky GT3R receiver and Turnigy Nano-Tech 5300mah 2s lipo:


… and an EXI D227F servo, BrushlessHobbies 120a ESC, and an old Castle 4600kv sensorless motor:


I’m still waiting on a couple more small pieces to finish it off, and I may eventually put on ST/SC/MT tires for more clearance, but other than that it’s done. Time to drive and enjoy…

Heart of the Leopard [2] – Bypass Surgery

[Recovered: Original post date July 15th 2012]

A couple of weeks ago I put a larger motor in my toy car. After running a few battery packs through it I noticed it occasionally making a “tick” noise when braking.

Then a few ticks if I stopped hard.

Then I started to hear it in reverse too. I thought it was because the drive cups were wearing and when I was in reverse (or slowing) they would bind… so I placed an order for new ones and crossed my fingers I could drive until they arrived.

Today by the time I went through three packs it was more of a full-on ratcheting sound when I reversed. I tried spinning all the driveshafts by hand but couldn’t detect where the problem was. Until I watched the wheels when I braked hard: the backs could lock up but the front tires would continue to roll. Since RC cars don’t have antilock front brakes… something was slipping in the front gearbox.

The stock grease in that gearbox is red, and the fluid in the sealed differential is clear… so I knew it was bad when I opened things up and saw grey. The metal gears are grey 🙂 . Both the main driven gears had teeth worn down and bent sideways:


It was hard to see how many metal flakes had been worn off and mixed into the lubricant: but when I turned on the flash in the camera they really stood out: silver everywhere.


What happened? I had shimmed the diffs so there was no free play… but when I pulled the center driveshaft I could see the problem right away. Ball bearings aren’t supposed to sit on a shaft at an angle:


The innermost bearing was hollow: it has self-destructed and dumped its little bearing guts into the gearbox. The outer bearing was heavily damaged but intact… it looks like it kept the shaft in place well enough it would “dig in” to the larger gear when moving forward, but would deflect away and ratchet in reverse.

Bad luck with a dodgy stock bearing? Design weakness made worse by the stronger motor? First thing’s first: see if it’s repeatable 🙂 – a complete gearbox with bearings/differential/drivecups is only $20. I just have to wait for the mailman to bring it to me…

Heart of the Leopard

[Recovered: Original post date June 25th 2012]

Months ago when I was looking for a new motor for my Redcat Caldera SC-10E I saw a forum post and video for what claimed to be the best deal ever: a Tacon 3674 motor. Alas… it was also out-of-stock for months after that video… so I bought the next best thing for a bit more money: a Leopard Hobby 2650kv 3674 sensorless brushless motor.

I knew even before ordering it that it would be a bit of a project. Why? Because it was about 1/3rd longer than the green Tacon 3500kv that I currently owned:


…and the space the motor fit in was too short. About 1cm behind the Tacon motor was a grid-type pattern of plastic molded into the chassis: apparently as reinforcement. But I owned a Dremel, so I figured I could trim it down and wedge the big red Leopard in there 🙂


But first I had to take everything apart. The RedCat is very modular: 13 small screws come out of the top of the center blue aluminum chassis brace…


…and the brace comes off with all my electrics. That’s not the regular location for the radio and ESC, but I’ve been fiddling with the Caldera enough it was a convenient spot to place them. Plus I was using a larger 1/8th-scale ESC temporarily… as the original model was mounted about 3″ above the ground when it was driven into about 4″ of water in a stream (not by me) 🙂


The front and rear ends are also modular: with the suspension, bumpers and body mounts attached to the gearboxes. Four screws for the rear, eight screws for the front, and seven screws for the center diff and the entire truck basically falls apart… leaving me with a chassis that needed some gentle love from my favorite rotary tool.


Now that things were apart I could easily measure how much of that grid pattern needed to be trimmed away:


Did I mention the RedCat was modular? 🙂 Even the chassis is built of three pieces, so I could detach just the edge I needed to work on:


And here’s the result after some Dremeling, cleaning, and reassembly. I had initially nibbled away a 3×2 pattern, but it wasn’t quite long enough, so ended up sawing off 3×2.5 blocks:


While I had the chassis apart I mounted the new motor with a 5mm 32p 13t pinion. It’s easy to adjust the mesh: instead of trying to get at the motor-mount screws while the center diff is in the truck you can take out the top front+rear brace screws, and the bottom center-diff screws – which leaves the diff firmly attached to the aluminum plate with extremely easy access to the motor. You basically get the guts of the powertrain on a stick:


Here it is all mounted back up…


…and a final shot of the new shiny red Leopard ready-to-run. I just finished the heart transplant before bed, but will take it for a drive tomorrow.


I’ll be running the new setup on higher voltage (11.1v vs. 8.4v) to offset the lower KV motor, and with the 13t pinion the gearing should give me a 10% increase in top speed. But I didn’t gear it for speed: instead I’m hoping for much stronger acceleration. Mashing the throttle should either break all four tires loose, or have it try its best to flip over backwards 🙂

20% More Red, 10% More Cat: Shredder SC

[Recovered: Original post date May 14th 2012]

On the weekend I lucked out and won a new Redcat nitro buggy: but since I only use electric RCs right now the friendly folks at Amazing RC Store let me use it towards an upgrade: a 1/6th scale Shredder SC! It’s the big brother to the Caldera SC 10E I bought from them about 2 months ago. It’s huge!


Here it is with the 1/10th scale Caldera for comparison:


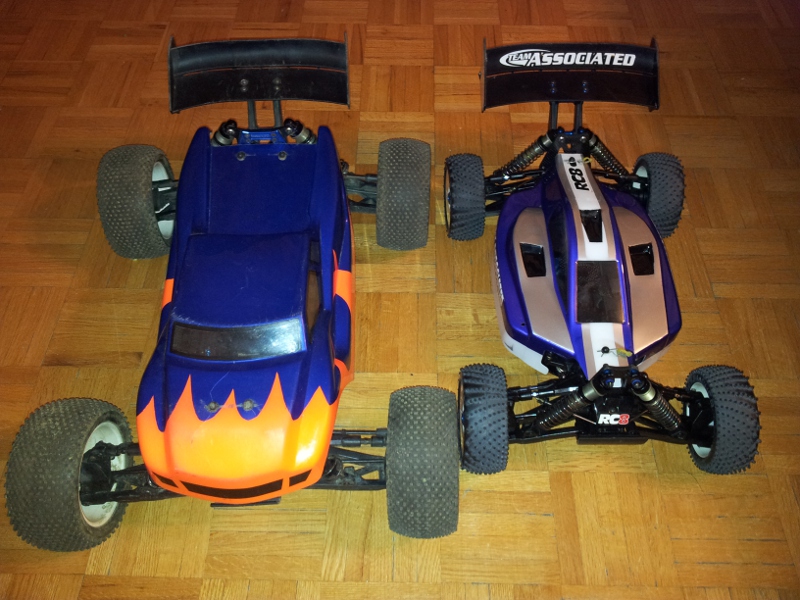
Here it is beside two of my other cars (L to R) 1/10th Caldera SC 10E, 1/8th Associated RC8Te truggy, and the 1/6th Shredder SC:


..and finally beside the body. Note that it has 4 aluminum rods sticking out from the side of the chassis: they poke through from the inside (with body clips just on the outside of the plastic tub rails to keep them from getting pushed back in), and they’re drilled for 2 sets of body pins on the outer ends. The body only ships with clips on the outside of the body (preventing the sides of the truck from bending out, but not in). I added a second set of clips on the inside as well. The body has 8 clips holding it on: 4 on the ends of the posts, and 4 in the traditional place on the body mounts


The tires are large, with a strange size of rim (at least I had never seen it before). Instead of a regular 4″ truggy or monster-truck rim, they’re 4.5″ in diameter. From left to right: a Losi LST tire on a Pro-Line Tech 5 (4″) rim, then the Shredder SC tire, then a standard Pro-Line truggy tire on 4″ Associated rim (4″ as well). The Shredder rims are larger, but the rubber is a low profile: making only slightly larger than the truggy tire. But it does use a standard 17mm hex.


The foams in the tires are firm, and the profile isn’t rounded at all: they’re flat straight across. I was expecting a very hard RTR rubber… but actually they’re fairly soft (compared to the rubber Traxxas likes to put in their “wears-like-iron” Talon tires). The tread pattern has blocks about the same size as what’s on a Pro-Line Badlands 2.8″, except obviously many more blocks, with a slightly tighter spacing. Here’s the stock Shredder tires compared to the Losi LST rubber:


The tires have scuffed up nicely after about 3 sets of batteries: I think I’m going to like them! Although when they wear out I may just go back to standard 4″ rims to get a wider selection of aftermarket rubber, since I know I can keep the larger profile buy getting MT tires. Something like the Losi 420 pins look nice for bashing 🙂 . Note: You’ll want to use 1/2″-offset rims, as I found zero-offset truggy rims would touch the steering arms (i.e the LST tire mounted on the left in the image below is on a zero-offset rim, and is too close to the chassis and will bind with the steering arms).


But getting back to the rest of the truck: it comes with the standard rebranded FlySky GT2 2ch 2.4GHz radio and receiver (second best bang-per-buck budget radio, eclipsed only by the FS-GT3B). There’s a paper manual for the car and to program the ESC, as well as a 2s/3s balancing slow lipo wall charger (which I’ll probably never use).


It comes with an 80a HobbyWing ESC: which sounds a bit small for a car of this weight, but pushed it around fine and didn’t even get warm.


It has a 1500kv sensorless 3674 motor with Mod-1 pinion and spur (turning a standard shaft-drive front/center/rear sealed gear-diff drivetrain). Remember that motor in case HobbyPartz goes out-of-stock: it’s a very popular size for the price and if HP doesn’t have it ordering this one as a spare part from a Redcat dealer may be the way to go. I don’t know if it’s rated for 6s (ships with 4s worth of batteries), but I’m going to try it! 🙂 The motor comes with a heatsink and large fan: I like to see the bigger fans since they don’t seem to die as easily as some other small fans I’ve had before.


Speaking of batteries: it comes with 2 20c 3200mah 2s hard-case lipos, and everything (including ESC) are wired with common 4mm bullet connectors (which I replaced with Deans). They also have the worlds shortest balancing leads?


There is lots of room for the batteries: the straps that hold them in are adjustable, and there’s plenty of room in front/behind/beside the battery trays for larger setups. You could trim down the sides of the battery trays, Dremel slots through what’s left to hold velcro straps, and mount some impressively large packs in there. I have a few 5000mah 4s packs that I use in my truggy: I could easily dump two of them in there with a bit of trimming and just swap the series harness (2 x 2s) for a parallel Y-cable instead. Hello runtime! 🙂


Finally it comes with a 9kg metal-gear steering servo. It’s plenty strong and I had no problems with turning radius or ability to turn the tires at speed, but it did feel a bit slow (but I’m comparing it to a Savox SC-1268SG on 7.4v in my truggy, which isn’t apples-to-apples). It was actually a nice surprise, since the Caldera is running identical steering components (with shorter arms) and it had lot of binding out-of-the-box. The Shredder steering was smooth without any fiddling with it.


Another nice thing compared to the Caldera: hex hardware all around – no self-tapping screws! I couldn’t find a single Phillips screw anywhere, hooray! But even though the screws and bolts were upgraded, there was a lot in common with the other Redcat “10E” and “8E” (1/10th and 1/8th) vehicles. First, the pan chassis is a stretched version of what comes with the 8E cars: including the same center-diff: (see the 1-foot yellow plastic ruler for scale)


The shocks are upgrades: long-travel big-bore threaded aluminum, and the suspension comes out-of-the-box with swaybars (paid upgrades on the 10E’s), but everything else was the same.


Here’s the Shredder (left) nose-to-nose and tail-to-tail with the Caldera (right). Same front and rear plates: almost the same bumpers (Shredder’s is a bit longer, but same mounts), same front and rear diffs and shock towers. Body mounts are the same style (can’t see them, but the Shredders are simply taller). Same hub carriers and front hubs (but Shredder hubs are the upgraded metal versions). Same servo saver bellcranks, and steering racks (Shredder gets the aluminum rack, Caldera has plastic). A-arm pin braces are identical etc.


Other than the center diff and motor mounts (and motor/ESC etc) the powertrain on the 1/10, 1/8 and 1/6 (10E, 8E, and Shredder models) are identical except for the length of the driveshafts. It should be easy to keep these two SCTs running, since in most cases if I have spares for one it means I have spares for the other 🙂

Finally, here’s the Shredder SC beside my RC8Te, just charged up and waiting for the first drive.


I’ve only put a couple pairs of batteries through it so far but I love how it drives. My 1/8th truggy drives nicer than my 1/10th models, and the 1/6th Shredder drives even nicer still: very easy to control during powerslides, and the back only comes around if you either chop-or-punch the throttle on gravel, or if you back off about 25% throttle on pavement. The huge chassis is very easy to clean: totally wide open so if you just flip it over and shake it 90% of the dirt just falls out (compared to my Caldera, with a chassis that’s 10% functional, and 90% nooks-and-crannies that trap dirt, mud and gravel). The radio was bound properly out-of-the-box, the batteries are putting out their rated capacity, and the steering and ESC trims were perfect without fiddling with them.

So far I love it, and the huge size turns heads when I take it to the local park. After telling you about all the good things, I do have a couple small nits to pick:

Issues

I’ve run into a few things already, and have a hole punched through the front of the right front fender, from a relatively minor disagreement with a cement post. Not sure if I’m unlucky, or if the body is a bit thin or brittle?

  • The 4.5″ rims are a bit strange, though I like the tires. Would have preferred 4″ rims, but because they’re standard 17mm hex I can’t really complain
  • From the tiny bit of residue I can see around the drive cups on the diffs, they’re filled with the same red sticky grease as on the Caldera. Standard silicon oil would have been nice.
  • The body sticks out over an inch from the front and rear bumpers. I’m going to add the secondary bumpers from the Caldera to take up the space and give a bit more cushion. They bolt right on so they would have been nice standard
    The side body holes that the aluminum rods go through aren’t drilled in the correct place. You can still put the body on easily, but when the Shredder is upside down it looks a bit goofy, since some of the posts don’t come out from the center chassis at a 90-degree angle. Sort of looks like you bent them.
  • Steering servo is slow, but perfectly functional. Still a huge upgrade from the plastic-gear 3kg model that shipped with my Caldera (Note: Redcat support quickly replaced it with a newer 6kg model)
  • It’s a bit oversprung straight out of the box: even with the batteries loaded it had zero droop. But it’s easy to adjust it – the shocks shipped with the ride height collars cranked up a bit, so you can back them off.
  • Pinion has a brass appearance: like on the SC 10E. If it’s the same metal as the Calderas pinion it’s going to wear quickly

That’s all the notes I have time to make for now: I’m going to take some driving pics and hopefully video as well, soon. I’m going to drive it stock for a couple weeks, then consider putting the Shredder XT truggy body on it (like the open-wheel look, and gives me room for LST tires)… maybe swapping in my 150a Xerun ESC to try it on 6s, and if the servo is bugging me I’ll try my Savox 1268MG from the RC8Te to see if it would make a good upgrade.

Other than that, drive the wheels off 🙂